Chapter 1 Introduction
1.1 Getting started with FaultTree on R
This introduction will cover installation of R and the FaultTree package. R has been selected as the container environment for this open source Fault Tree Analysis software. R is an excellent prototyping environment, although it is not known for its user friendliness. This introduction will hopefully get tentative users off to a running start. Although R is multi-platform environment, this introduction will be made from a Windows user perspective.
A Windows installer for the R environment is available for free download starting at https://www.r-project.org/
Select the download link, then choose a mirror (the first selection always works for me). Here you will view the download links for the three supported operating systems. It does not matter which version of Windows you are using. On a 32-bit installation you will get a 32-bit R system. On a 64-bit system you will get both the 32-bit and the 64-bit installation. Don’t worry it doesn’t really matter which one you use. We are only concerned with a base installation, click on the ‘install R for the first time’ link.
It is fine to install with default conditions, however, this creates an MDI application where multiple instances can run in a single container. I find this uncomfortable and prefer the SDI format. Want to try again? Uninstall through the ControlPanel and re-run the installer. This time select a ‘custom installation’, which will give you a chance to install the SDI format. All the other defaults are fine.

I should mention here that there is a further developer environment that some prefer called R Studio. This application gives an unabashed look and feel of MatLab to R. This is also available as a free download at https://www.rstudio.com/products/RStudio/
The remainder of this introduction will refer to the simplest R SDI installation. Really we don’t need to know much about the R programming language to use FaultTree. Most people find R to have a very steep learning curve, largely due to the stark terminal window that it opens up to. This introduction hopes to guide any first-time user to success.
FaultTree is a package that must be loaded into R. The package is hosted at R-Forge : https://r-forge.r-project.org/ From that location navigation would be required by search of Project – ftree. From that location one must select the R Packages link just below the Fault Tree and Event Tree Analysis title button. Or for those in a rush, just load the following URL: https://r-forge.r-project.org/R/?group_id=2125 Yes, there is more than one package addressed here. We of course want FaultTree. There are two ways to load this package into your R installation I will walk through both. You can download the .zip file next to the Windows logo. But, do not unzip this as one might expect! Rather, we will open this using the R environment. Run an R instance – as administrator. This is usually accomplished by right clicking on the icon and selecting ‘Run as administrator’. I prefer this since only the administrator can load the package into the main R installation, rather than a separate user library. This is a bit of Linux legacy, but we now have users separate from administrator on Windows since Windows 7. Now, in the R Console select the Packages menu item. Then at the bottom of the dropdown menu select ‘Install package(s) from local zip files…’ Navigate to the location of the downloaded zip from R-forge and open it in R. You should see the following confirmation in the R Console:
utils:::menuInstallLocal()
# package ‘FaultTree’ successfully unpacked and MD5 sums checked
Before continuing, I will mention perhaps an easier method of installation. R-forge provides an automated download and installation command line just underneath the Linux and Windows icons with (.tar.gz) and (.zip) respectively. Generally from the latest version of R (that’s what you have if you just downloaded for the first time) -as administrator - you should be able to just copy and paste the installation command: install.packages(“FaultTree”, repos=“http://R-Forge.R-project.org”) directly into the R Console.
install.packages("FaultTree", repos="http://R-Forge.R-project.org")I just tried this with R version 3.3.1 and it did not work because R-Forge had not gotten around to updating the package build (at version 0.0.9) since R version 3.3.0 . So I got a failure message for this reason. However the earlier zip method works on all versions.
Alternatively install from GitHub repository:
devtools::install_github("CarlesCG/FaultTree")This installation operation is only performed once per version of the package. From this point we can use the FaultTree package on each session of R by just mounting the library, which has already been installed in your local file system. This is done by the simple command line directly into the R Console:
1.2 Load FaulTree package
library(FaultTree)This command line only needs to be executed once each R session. That is you can simply open either the 32-bit or the 64-bit R icon by double click and enter this library entry. You may get a warning about the package built under a different R version, but this is only a warning of no significance. There is no harm in making the library call repeatedly, it is just not necessary. Many example scripts will include the library line, perhaps as just a reminder.
To conclude this introduction we will run an example. An alternate location for posting of this package source is located on Github: https://github.com/jto888/FaultTree A README.md file opens below the repository. Simply copy and paste the presented script (repeated below) into the R Console.
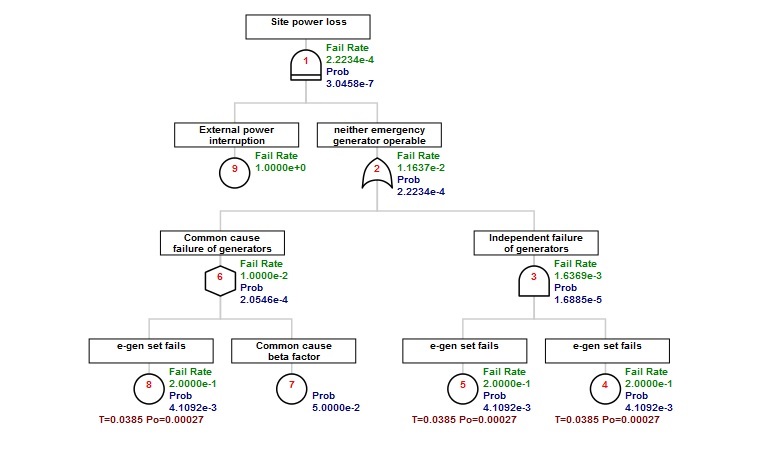
tree1<-ftree.make(type="priority",reversible_cond=TRUE, name="Site power loss")
tree1<-addLogic(tree1, at=1, type="or", name="neither emergency", name2="generator operable")
tree1<-addLogic(tree1, at=2, type="and", name="Independent failure", name2="of generators")
tree1<-addLatent(tree1, at=3, mttf=5,mttr=12/8760,inspect=1/26, name="e-gen set fails")
tree1<-addLatent(tree1, at=3, mttf=5,mttr=12/8760,inspect=1/26, name="e-gen set fails")
tree1<-addLogic(tree1, at=2, type="inhibit", name="Common cause", name2="failure of generators")
tree1<-addProbability(tree1, at=6, prob=.05, name="Common cause", name2="beta factor")
tree1<-addLatent(tree1, at=6, mttf=5,mttr=12/8760,inspect=1/26, name="e-gen set fails")
tree1<-addDemand(tree1, at=1, mttf=1.0, name="External power", name2="interruption")
tree1<-ftree.calc(tree1)
tree1[,1:8]
## ID GParent CParent Level Type CFR PBF CRT
## 1 1 -1 -1 1 14 0.0002223396 3.045753e-07 0.001369866
## 2 2 1 1 2 10 -1.0000000000 2.223396e-04 0.001369866
## 3 3 2 2 3 11 0.0016369090 1.688518e-05 0.001369863
## 4 4 3 3 4 2 0.2000000000 4.109158e-03 0.001369863
## 5 5 3 3 4 2 0.2000000000 4.109158e-03 0.001369863
## 6 6 2 2 3 12 0.0100000000 2.054579e-04 0.001369863
## 7 7 6 6 4 4 -1.0000000000 5.000000e-02 -1.000000000
## 8 8 6 6 4 2 0.2000000000 4.109158e-03 0.001369863
## 9 9 1 1 2 3 1.0000000000 -1.000000e+00 -1.000000000The fault tree exists in R as a dataframe object. We can view most output of interest in just the first 8 columns. Each node of the tree occupies a line of the dataframe and they are sequentially given a numbered ID. The output of calculations are in the CFR, PBF, and CRT columns as explained. CFR is the Conditional Fail Rate PBF is the Probability of Failure (or Failed State) CRT is the Conditional Repair Time (this will only be used on reversible conditions through the Priority AND gate.) In this case all mean time to failure (mttf) and mean time to repair (mttr) values were input as years, so the CFR and CRT are also reported in these units. Probability is of course unit-less.
It is of course more pleasing to view the fault tree as a graphic, and in this regard the FaultTree package will not disappoint. Just add the following lines after the executed script above:
ftree2html(tree1, write_file=TRUE)## ID Parent Type CFR PBF CRT Cond
## 1 1 -1 14 0.0002223396 3.045753e-07 0.001369866 0
## 2 2 1 10 -1.0000000000 2.223396e-04 0.001369866 1
## 3 3 2 11 0.0016369090 1.688518e-05 0.001369863 0
## 4 4 3 2 0.2000000000 4.109158e-03 0.001369863 0
## 5 5 3 2 0.2000000000 4.109158e-03 0.001369863 0
## 6 6 2 12 0.0100000000 2.054579e-04 0.001369863 0
## 7 7 6 4 -1.0000000000 5.000000e-02 -1.000000000 1
## 8 8 6 2 0.2000000000 4.109158e-03 0.001369863 0
## 9 9 1 3 1.0000000000 -1.000000e+00 -1.000000000 0
## Name Name2
## 1 Site power loss
## 2 neither emergency generator operable
## 3 Independent failure of generators
## 4 e-gen set fails
## 5 e-gen set fails
## 6 Common cause failure of generators
## 7 Common cause beta factor
## 8 e-gen set fails
## 9 External power interruptionbrowseURL('tree1.html')Now the image below should appear in your default browser.